Exhibition game. Split squads and tryouts, an audition rather than a game plan, and one game of anything is noise. None of it feeds the site's ratings, season tables or game predictions — preseason is kept out of every model here by construction.
Strength and score are read from UTA's side, the same minutes at both ends: PP = UTA power play · PK = LAK power play · Leading = UTA ahead · ST = each club's own power play.
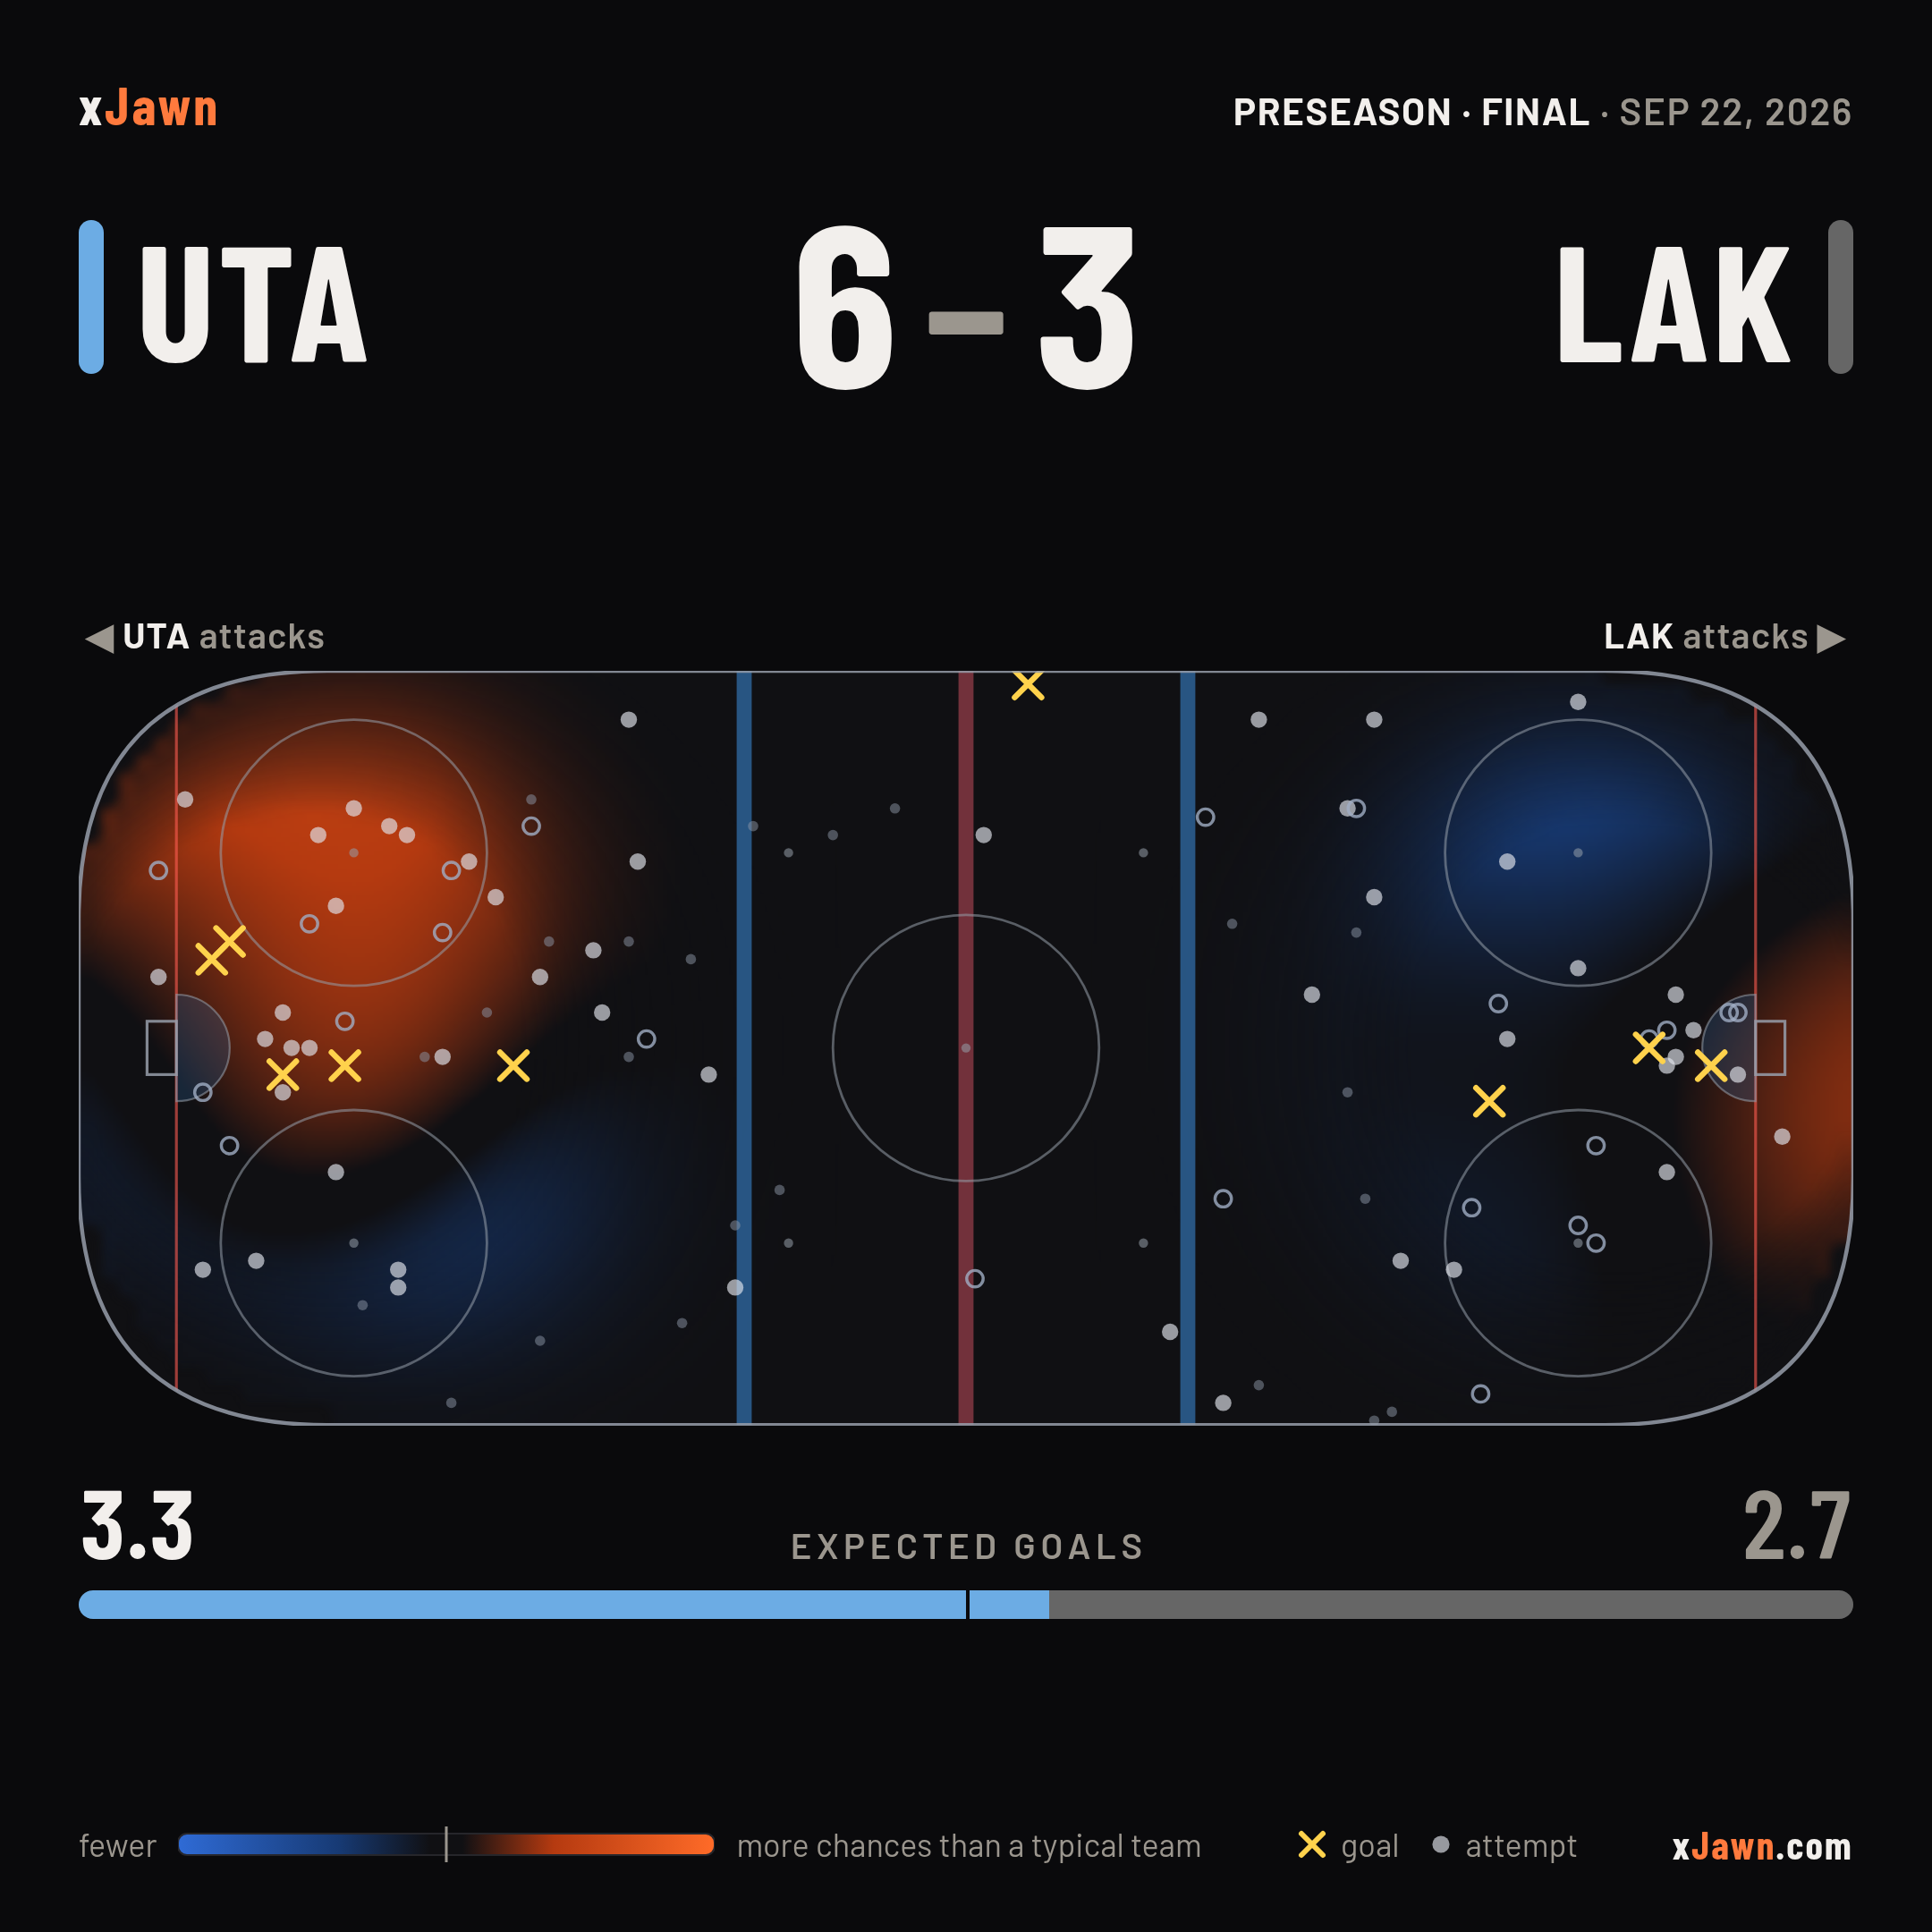
 UTA attacks◀ all strengths

How to read this map
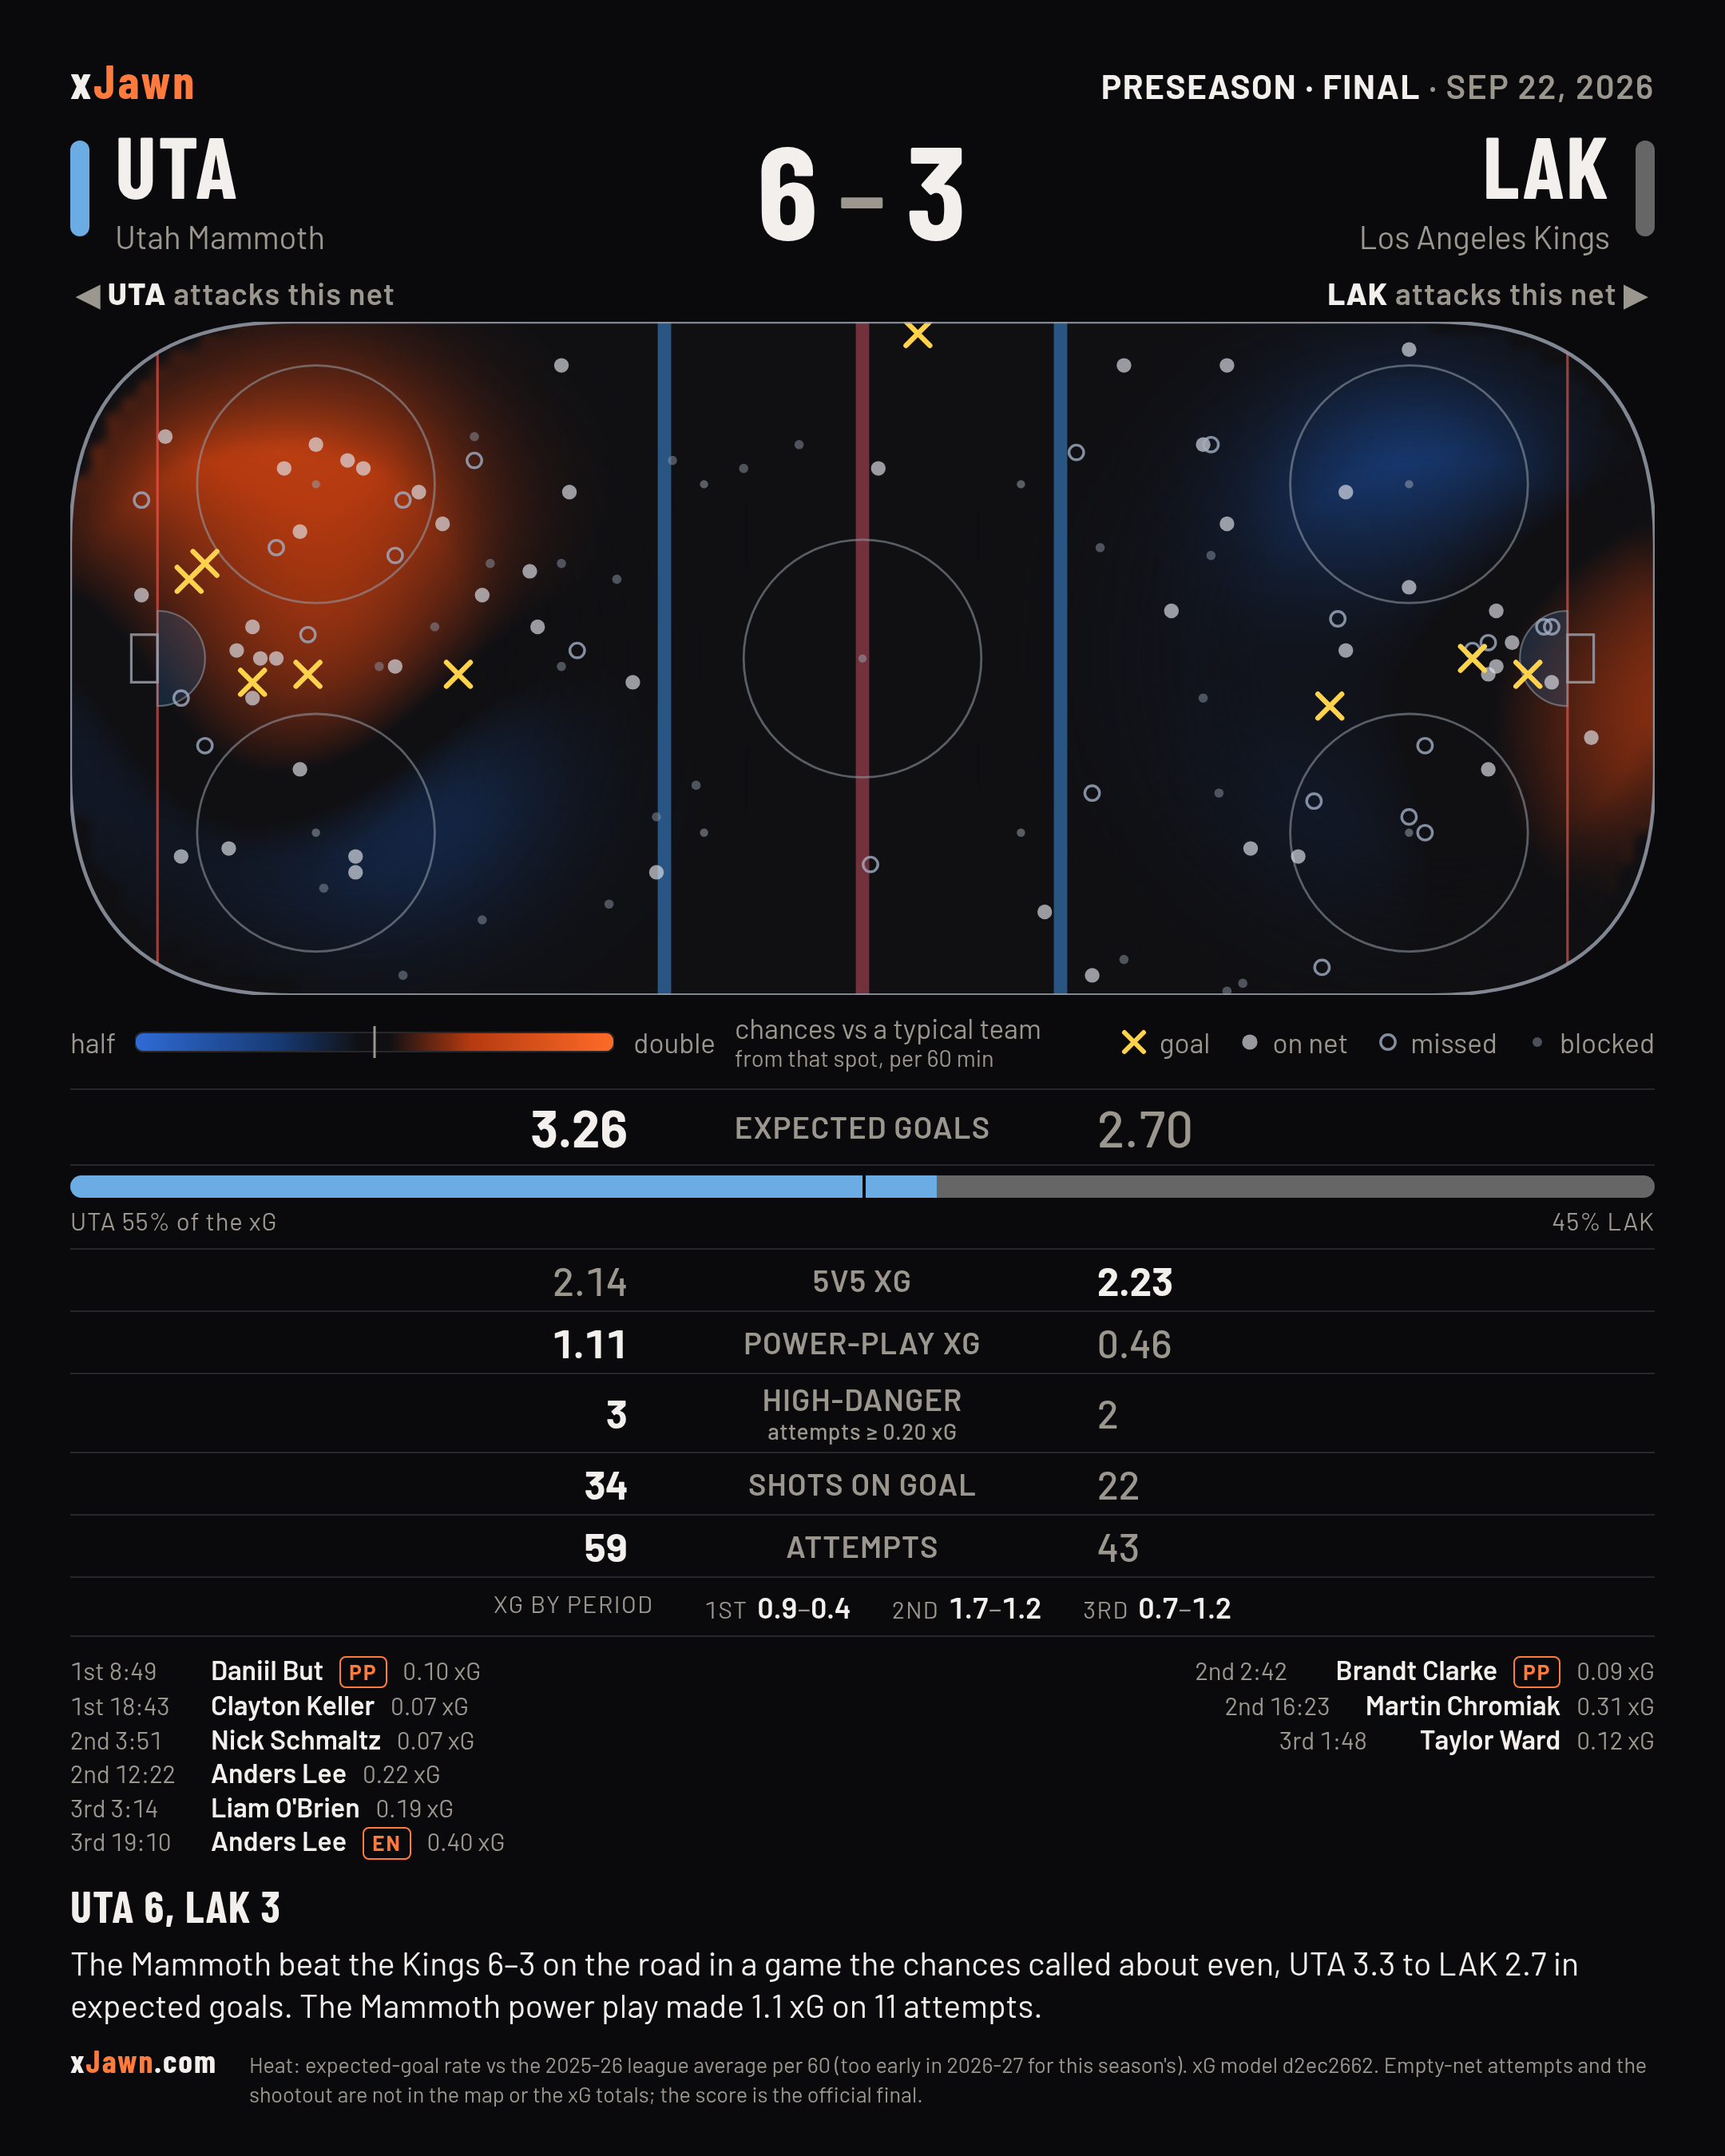
One rink, both teams: UTA attacks the left net, LAK the right. Every attempt is a Gaussian bump of height = its model xG. The controls switch the surface (xG heatmap ↔ vs league) and the markers; vs league compares this game against a typical NHL team-game under the same filter (2026-27 regular season, 283 games), so a 5v5 view is measured against league 5v5.
A strength or score filter is read from UTA's side and mirrored for LAK: “UTA PP” shows UTA's power-play attempts on the left and LAK's shorthanded attempts on the right — the same minutes of the game at both ends. Empty-net attempts are excluded unless you include them. The Player control narrows the map and the rows beneath it to the attempts by either club while one player was on the ice (for a goalie, while he was in net); his own attempts wear a blue ring. vs league switches off while a player is picked — the league baseline is a whole team-game, which one player's slice is not. Hover any attempt for the shooter, the result, its xG, and the inputs behind it: clock, strength, score, shot type, distance, angle, handedness, rush/rebound, what happened just before, and the goalie or the blocker.
What each side produced
all strengths · this gameThe Mammoth beat the Kings 6–3 on the road in a game the chances called about even, UTA 3.3 to LAK 2.7 in expected goals. The Mammoth power play made 1.1 xG on 11 attempts.
Counts come from the shot table behind the map: empty-net attempts and the shootout are excluded, so the goals here can trail the official final by an empty-netter or the shootout's deciding goal. Same numbers as the post-game cards.
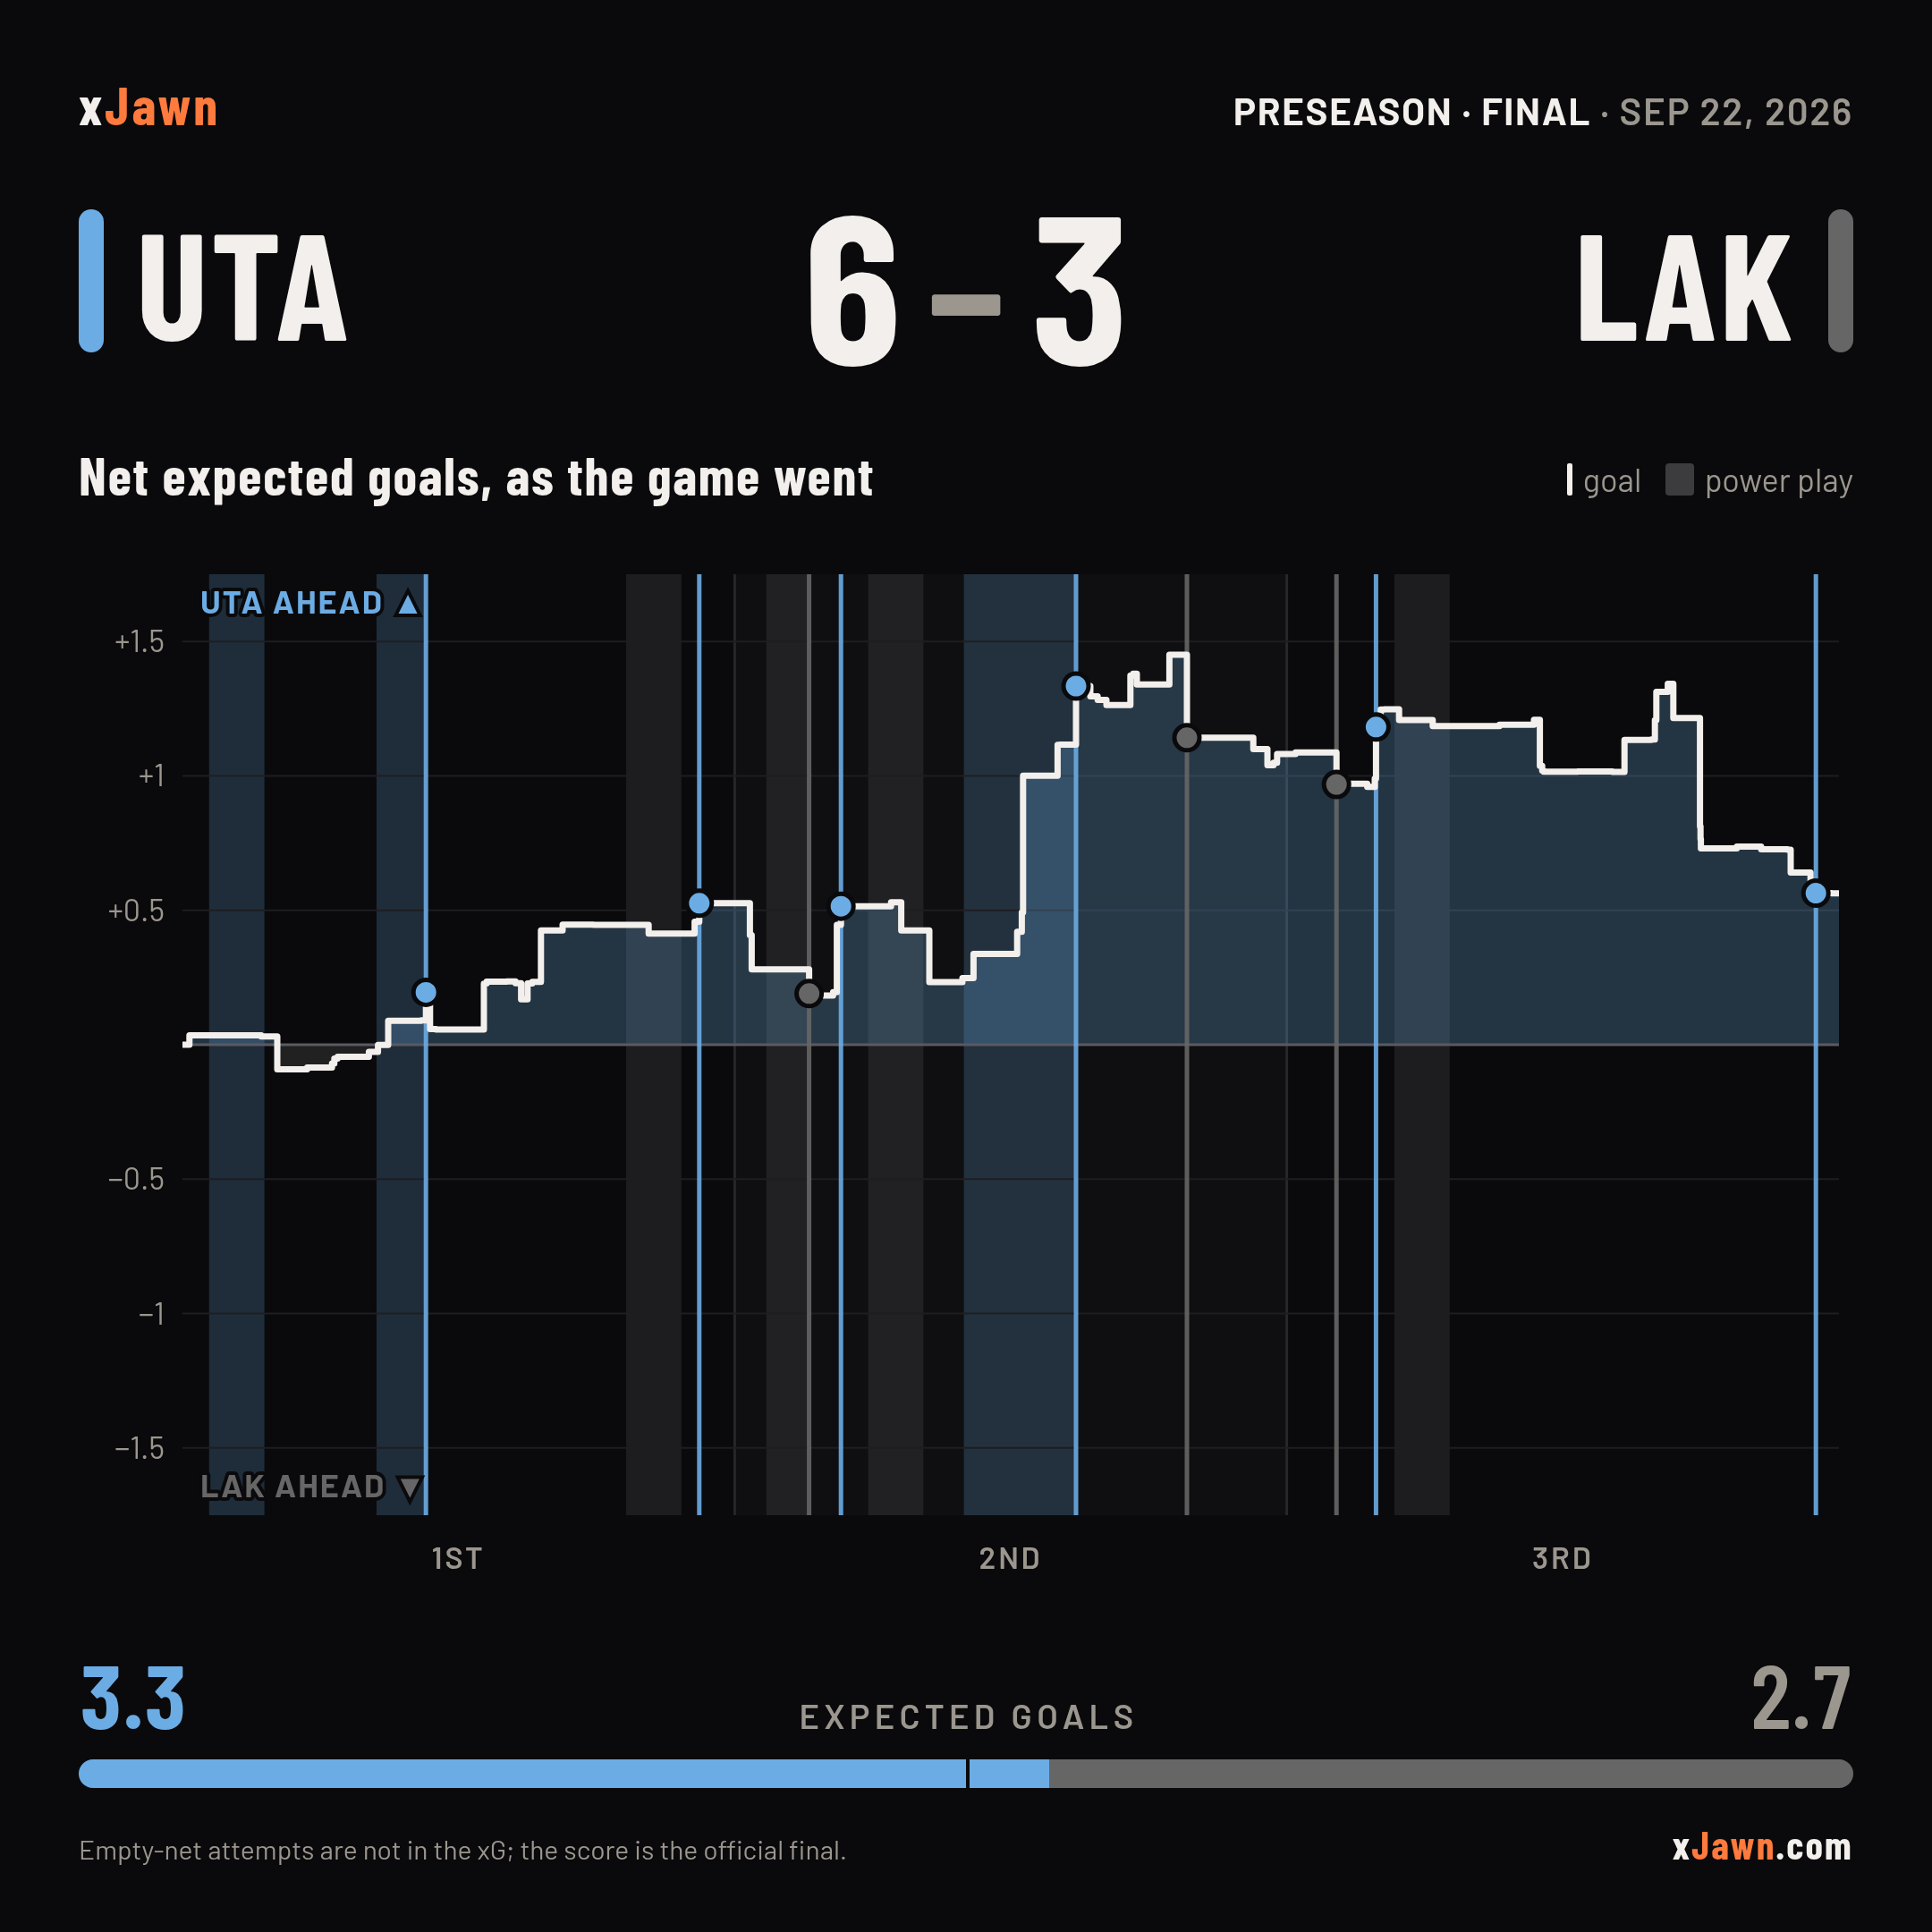
As the game went
all situations · this gameHow to read this
One line: cumulative UTA minus LAK expected goals. Above zero UTA is ahead on chances, below zero LAK is. Shaded bands are power plays in the side's colour; vertical lines are goals.
Goals
this game| Team | Scorer | Period | Time | xG | |
|---|---|---|---|---|---|
| UTA | Daniil But | 1st | 8:49 | PP | 0.10 |
| UTA | Clayton Keller | 1st | 18:43 | 0.07 | |
| UTA | Nick Schmaltz | 2nd | 3:51 | 0.07 | |
| UTA | Anders Lee | 2nd | 12:22 | 0.22 | |
| UTA | Liam O'Brien | 3rd | 3:14 | 0.19 | |
| UTA | Anders Lee | 3rd | 19:10 | EN | 0.40 |
| LAK | Brandt Clarke | 2nd | 2:42 | PP | 0.09 |
| LAK | Martin Chromiak | 2nd | 16:23 | 0.31 | |
| LAK | Taylor Ward | 3rd | 1:48 | 0.12 |
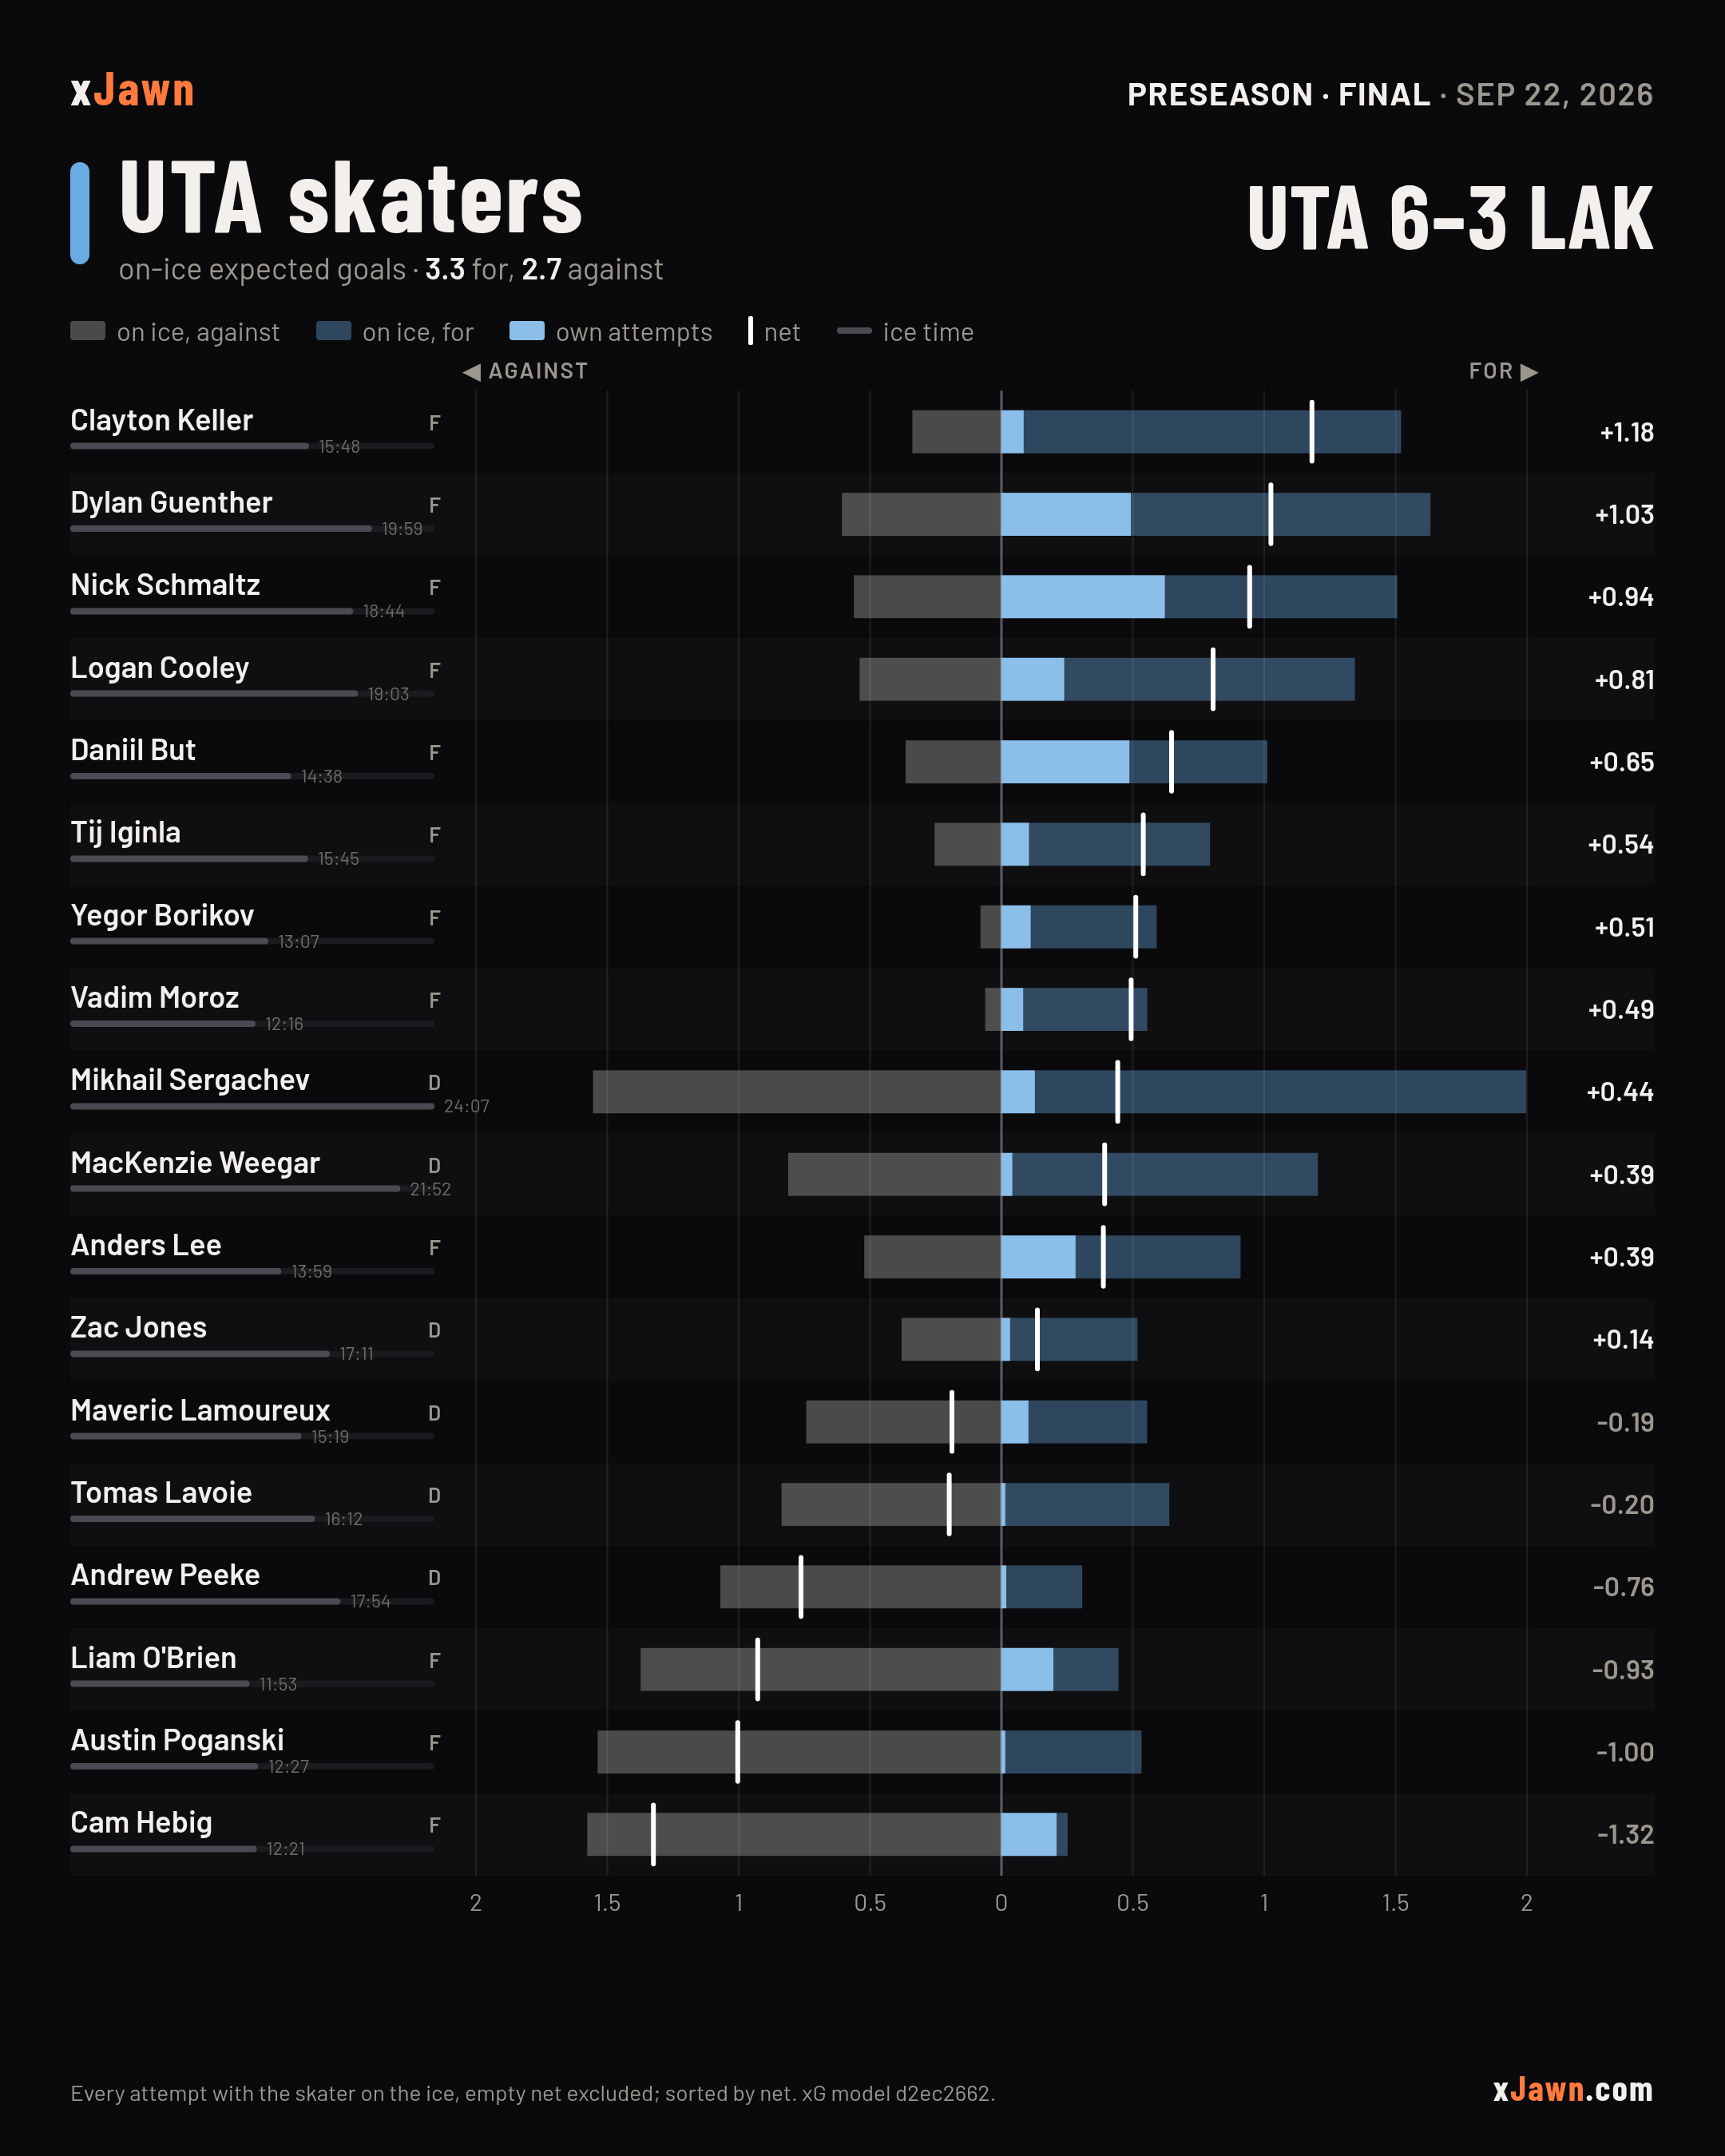
Skaters
all · whole game · this gameHow to read this
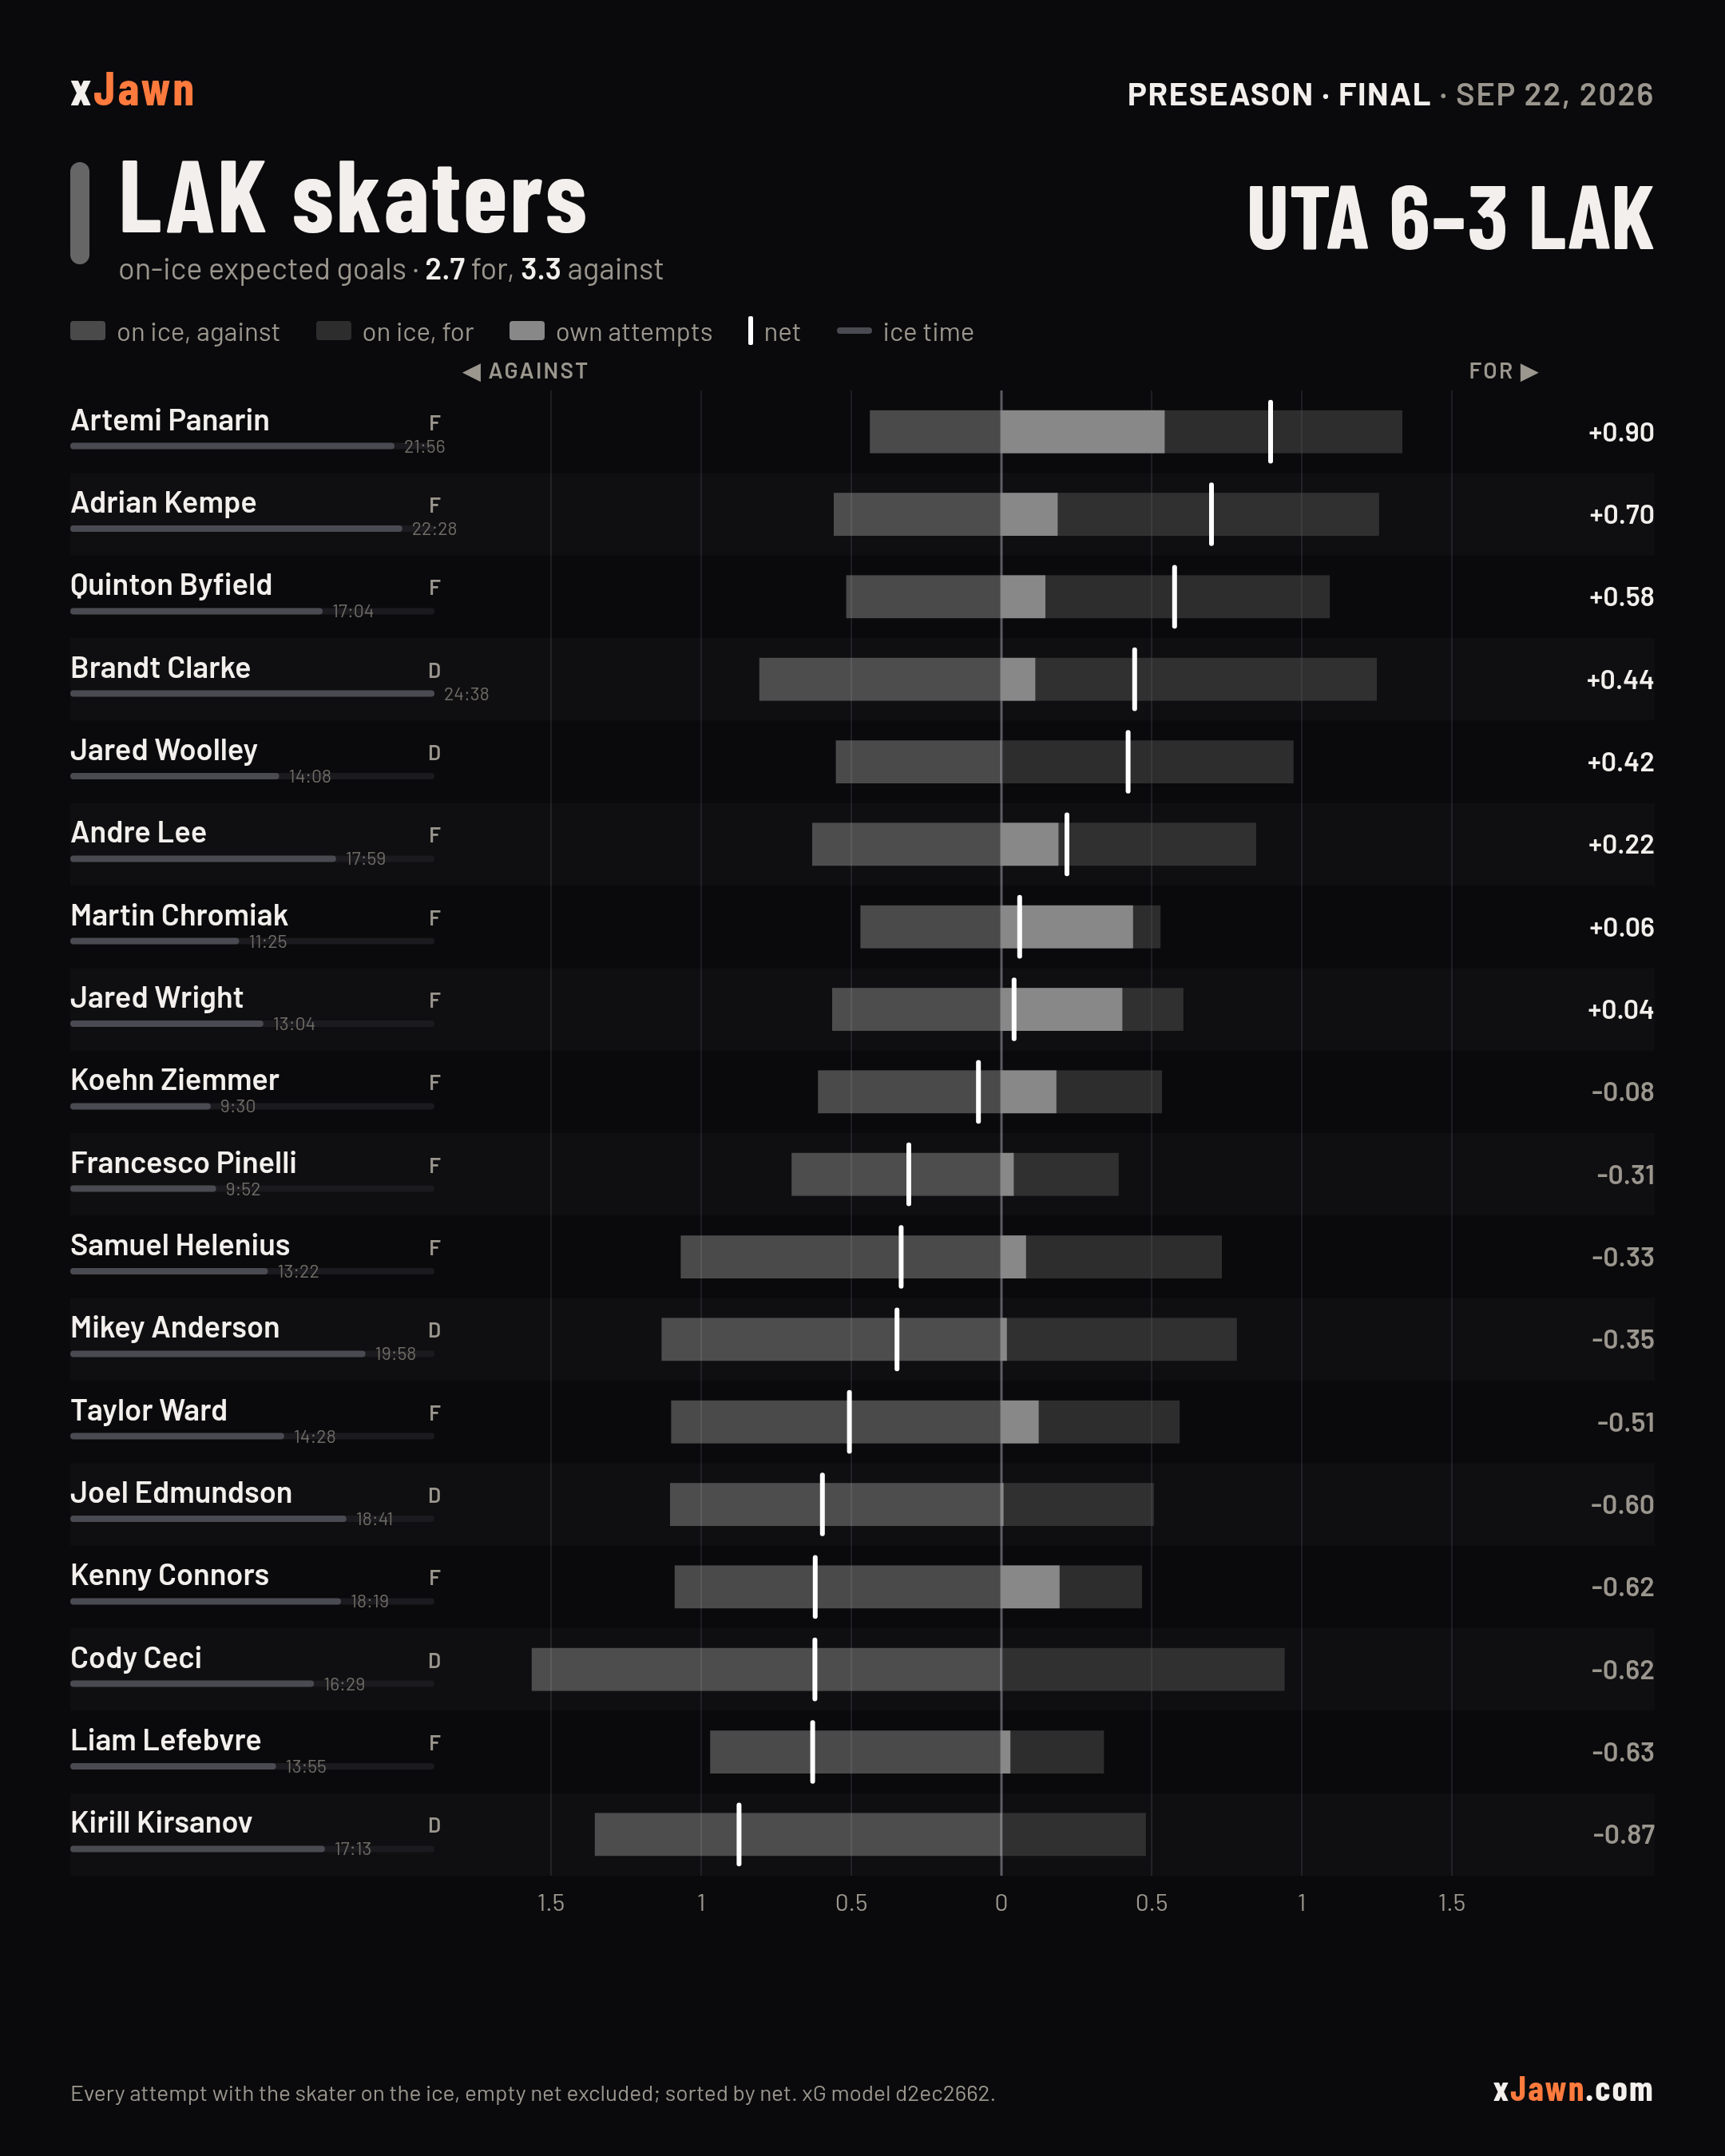
Every skater: on-ice xG against to the left of zero, for to the right, his own attempts as the solid bar, a hash at the net. The slim track under the name is ice time. The chart opens sorted by net, best first; pick another key to re-order it, and click the same key again to flip it. A name opens the player's page. Pick a period and every bar re-lays for that period alone on the same scale as the whole game, so the three periods add up to it; a skater who did not play in it fades to the bottom.
UTA
LAK
Lines & pairs
all · whole game · this gameHow to read this
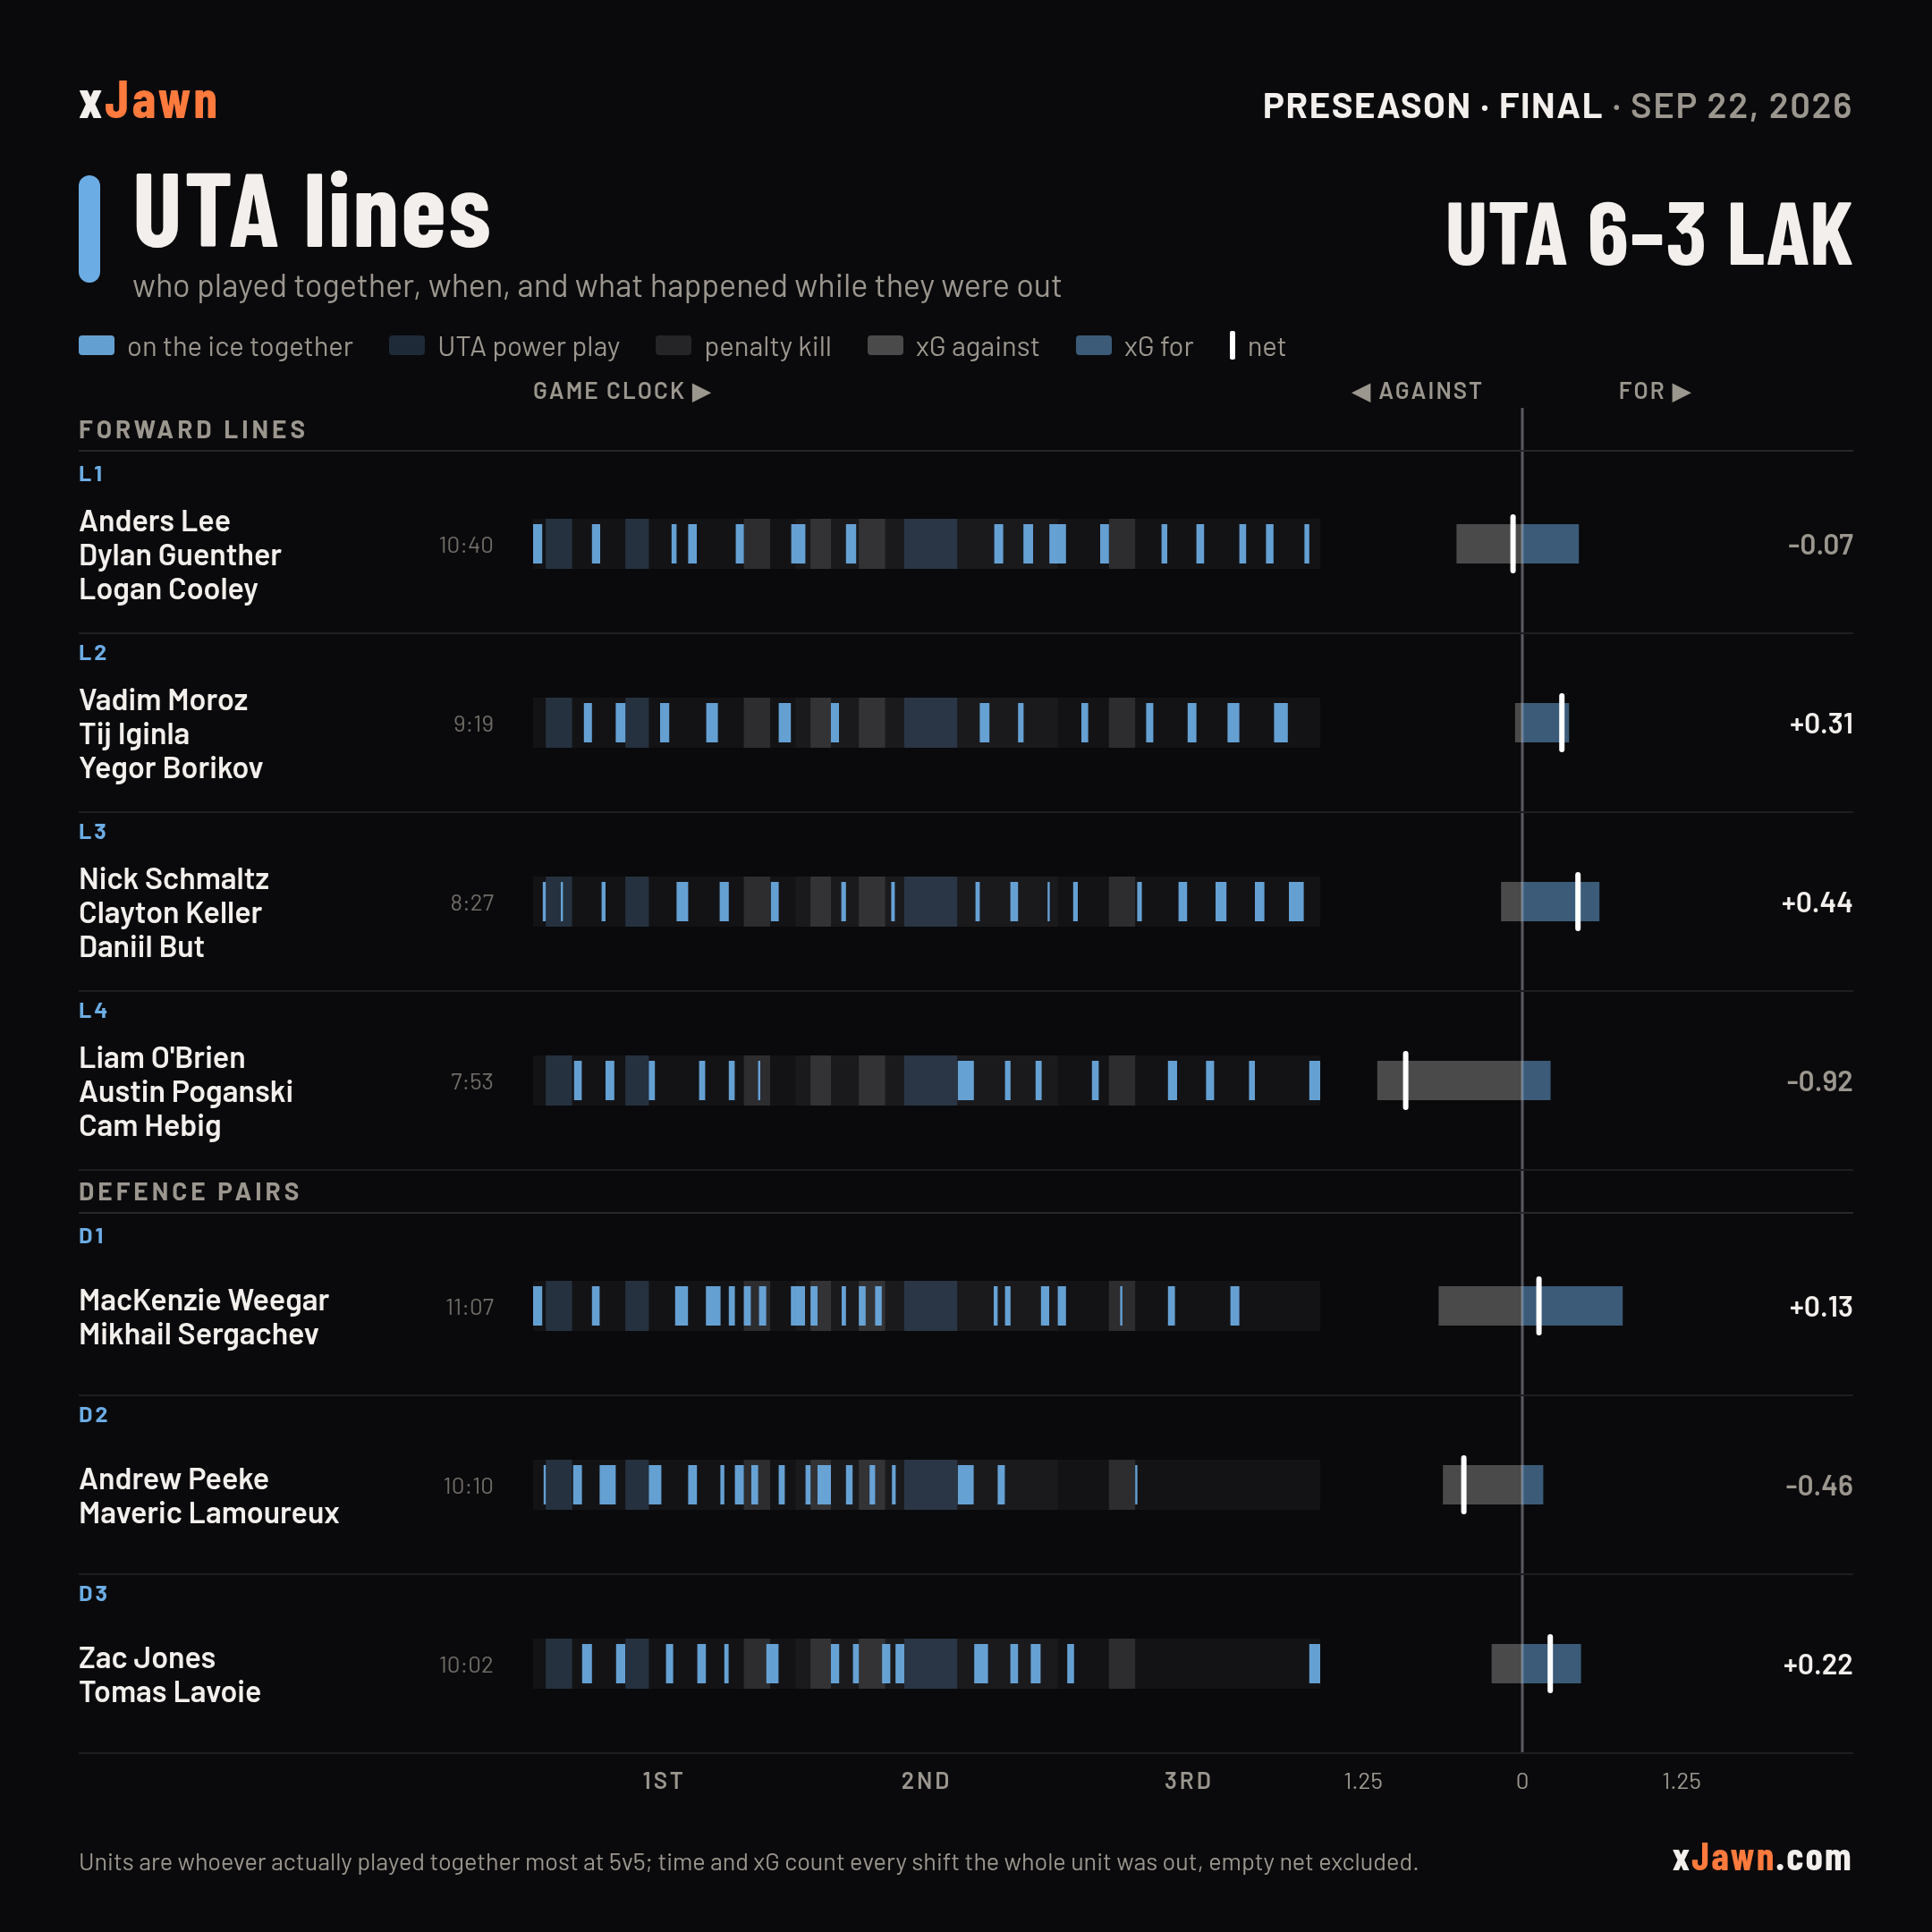
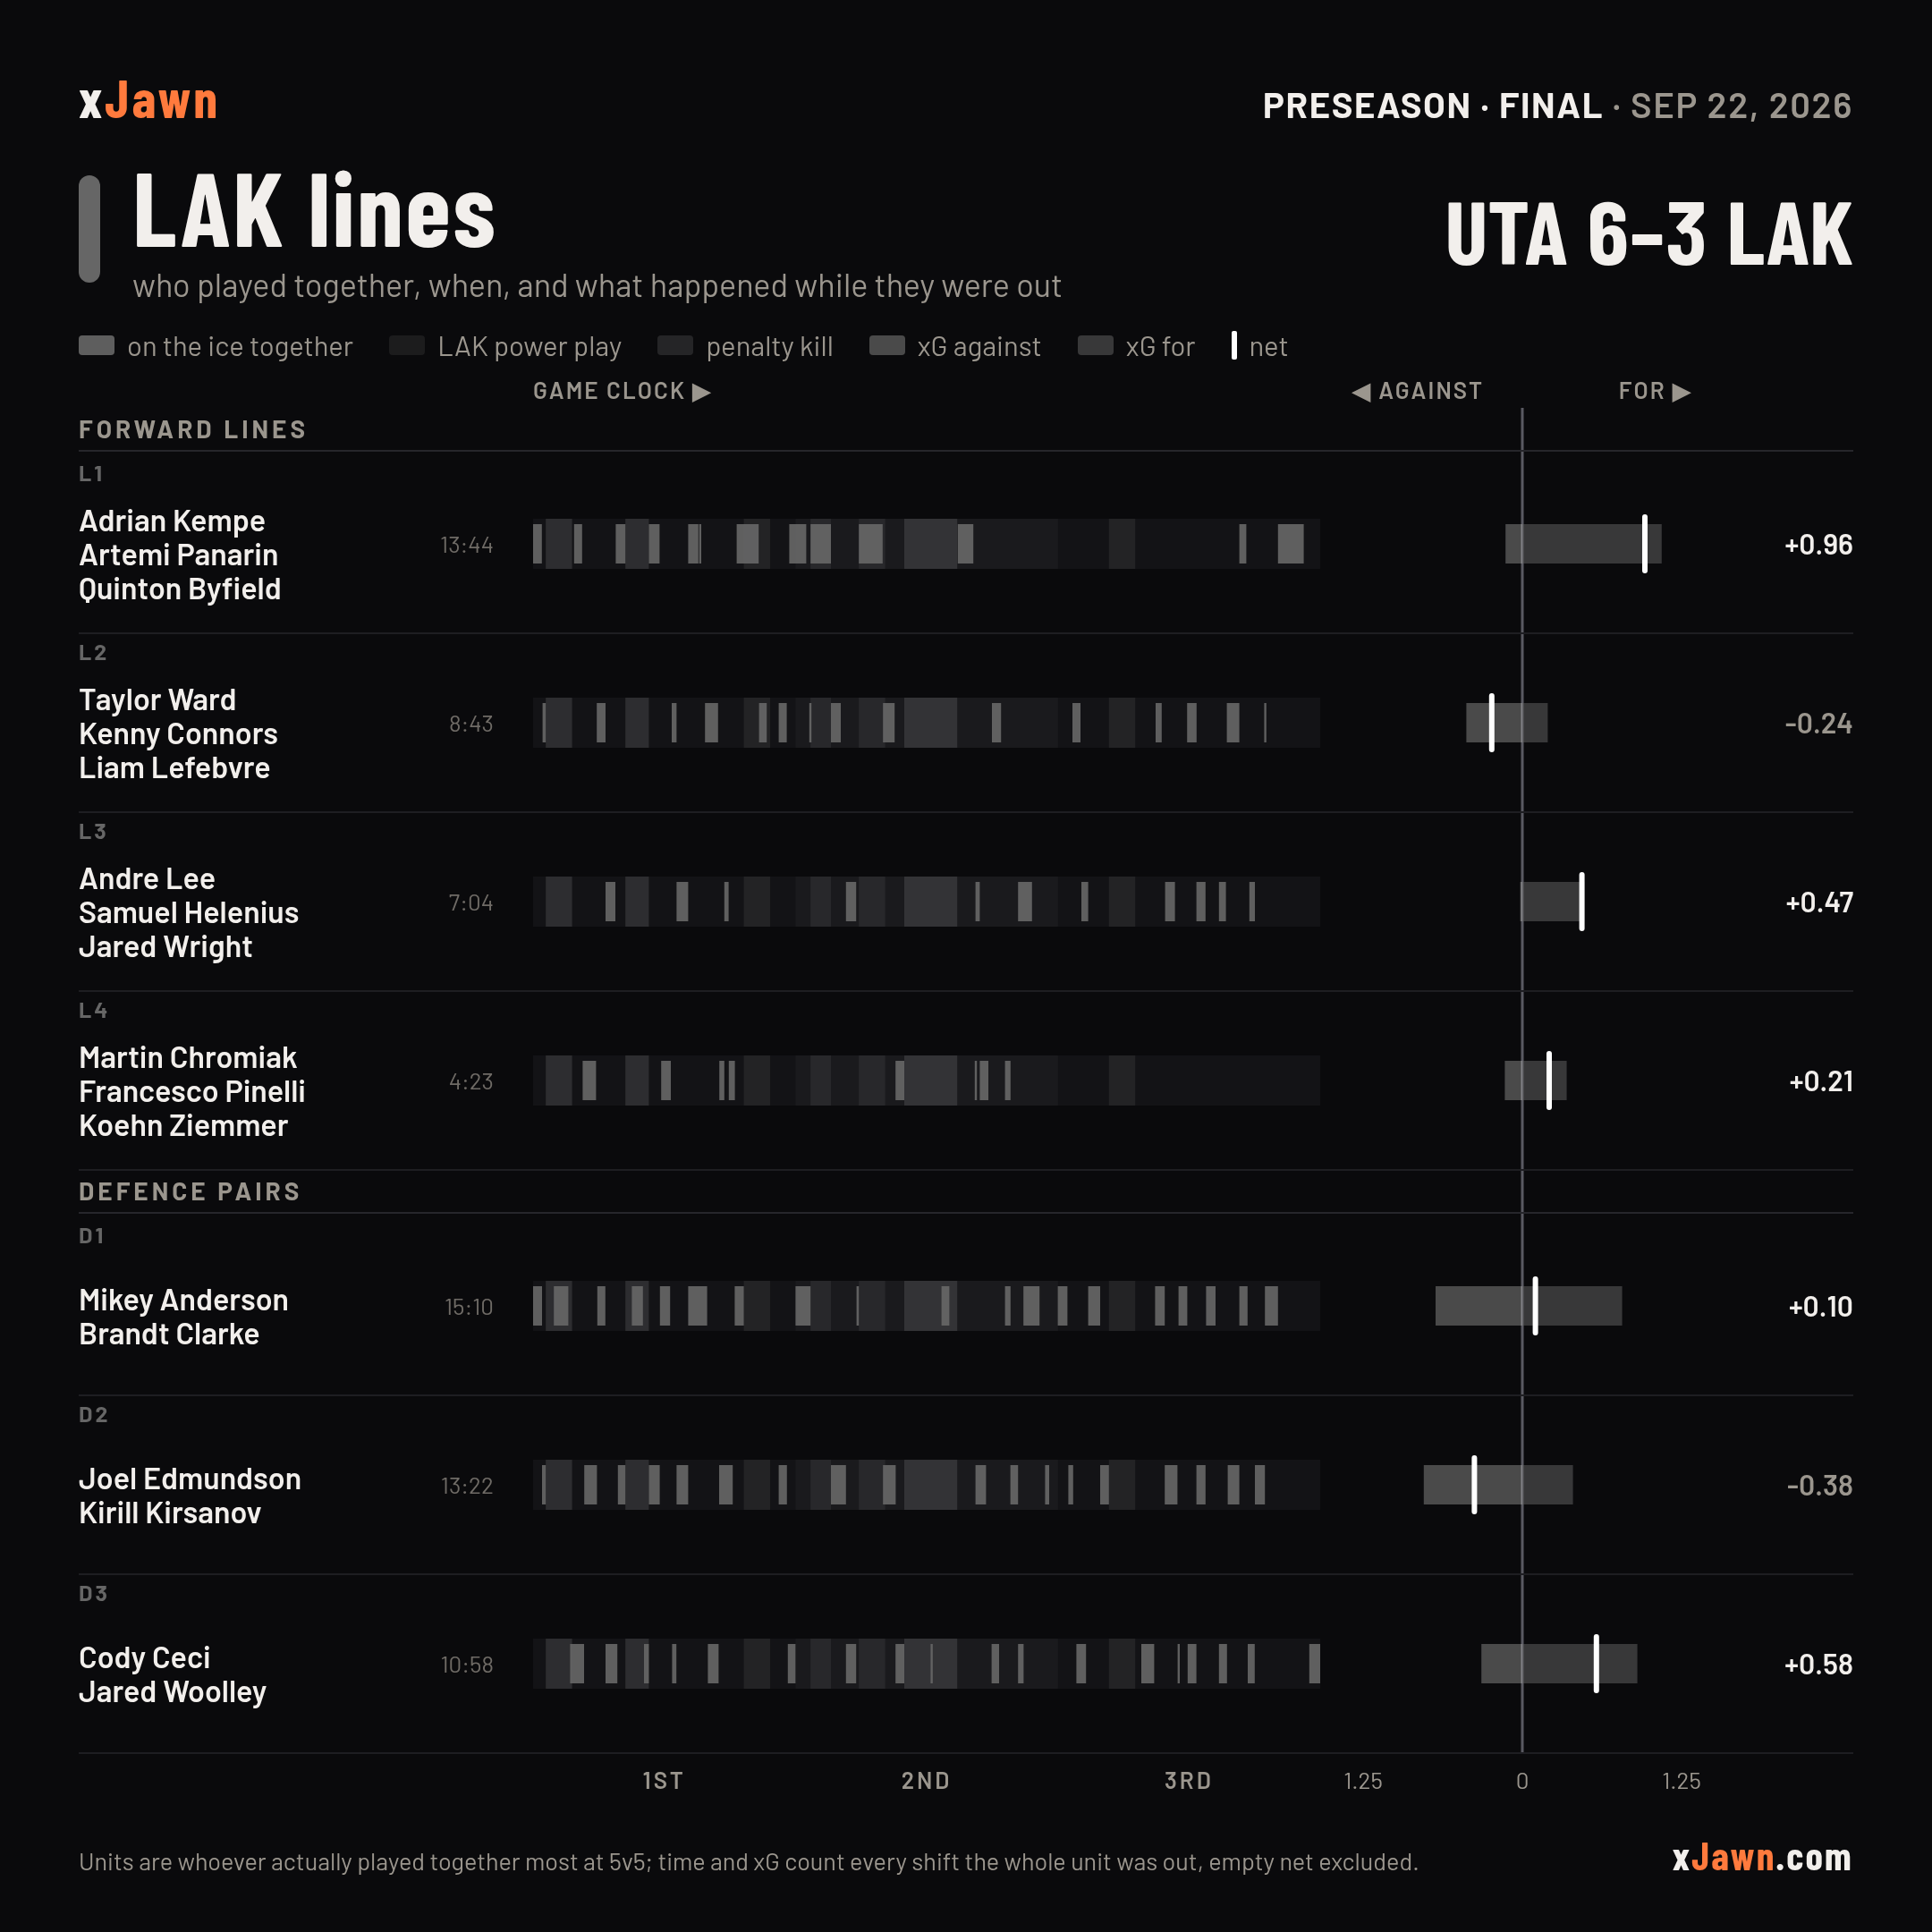
The units that actually played together most at the chosen strength — forward lines and defence pairs at 5v5, the whole group on the ice on the power play or the kill — each with when it was on the ice at that strength across the game clock (period and power-play bands behind the strip) and on-ice xG against / for while the whole unit was out, at that strength only. Sorted by time together; pick another key to re-order, and a name opens the player's page. Pick a period and the strip veils the rest of the game while the bars re-lay for that period alone, on the whole game's scale.
UTA
LAK
Matchups
5v5 · this gameHow to read this
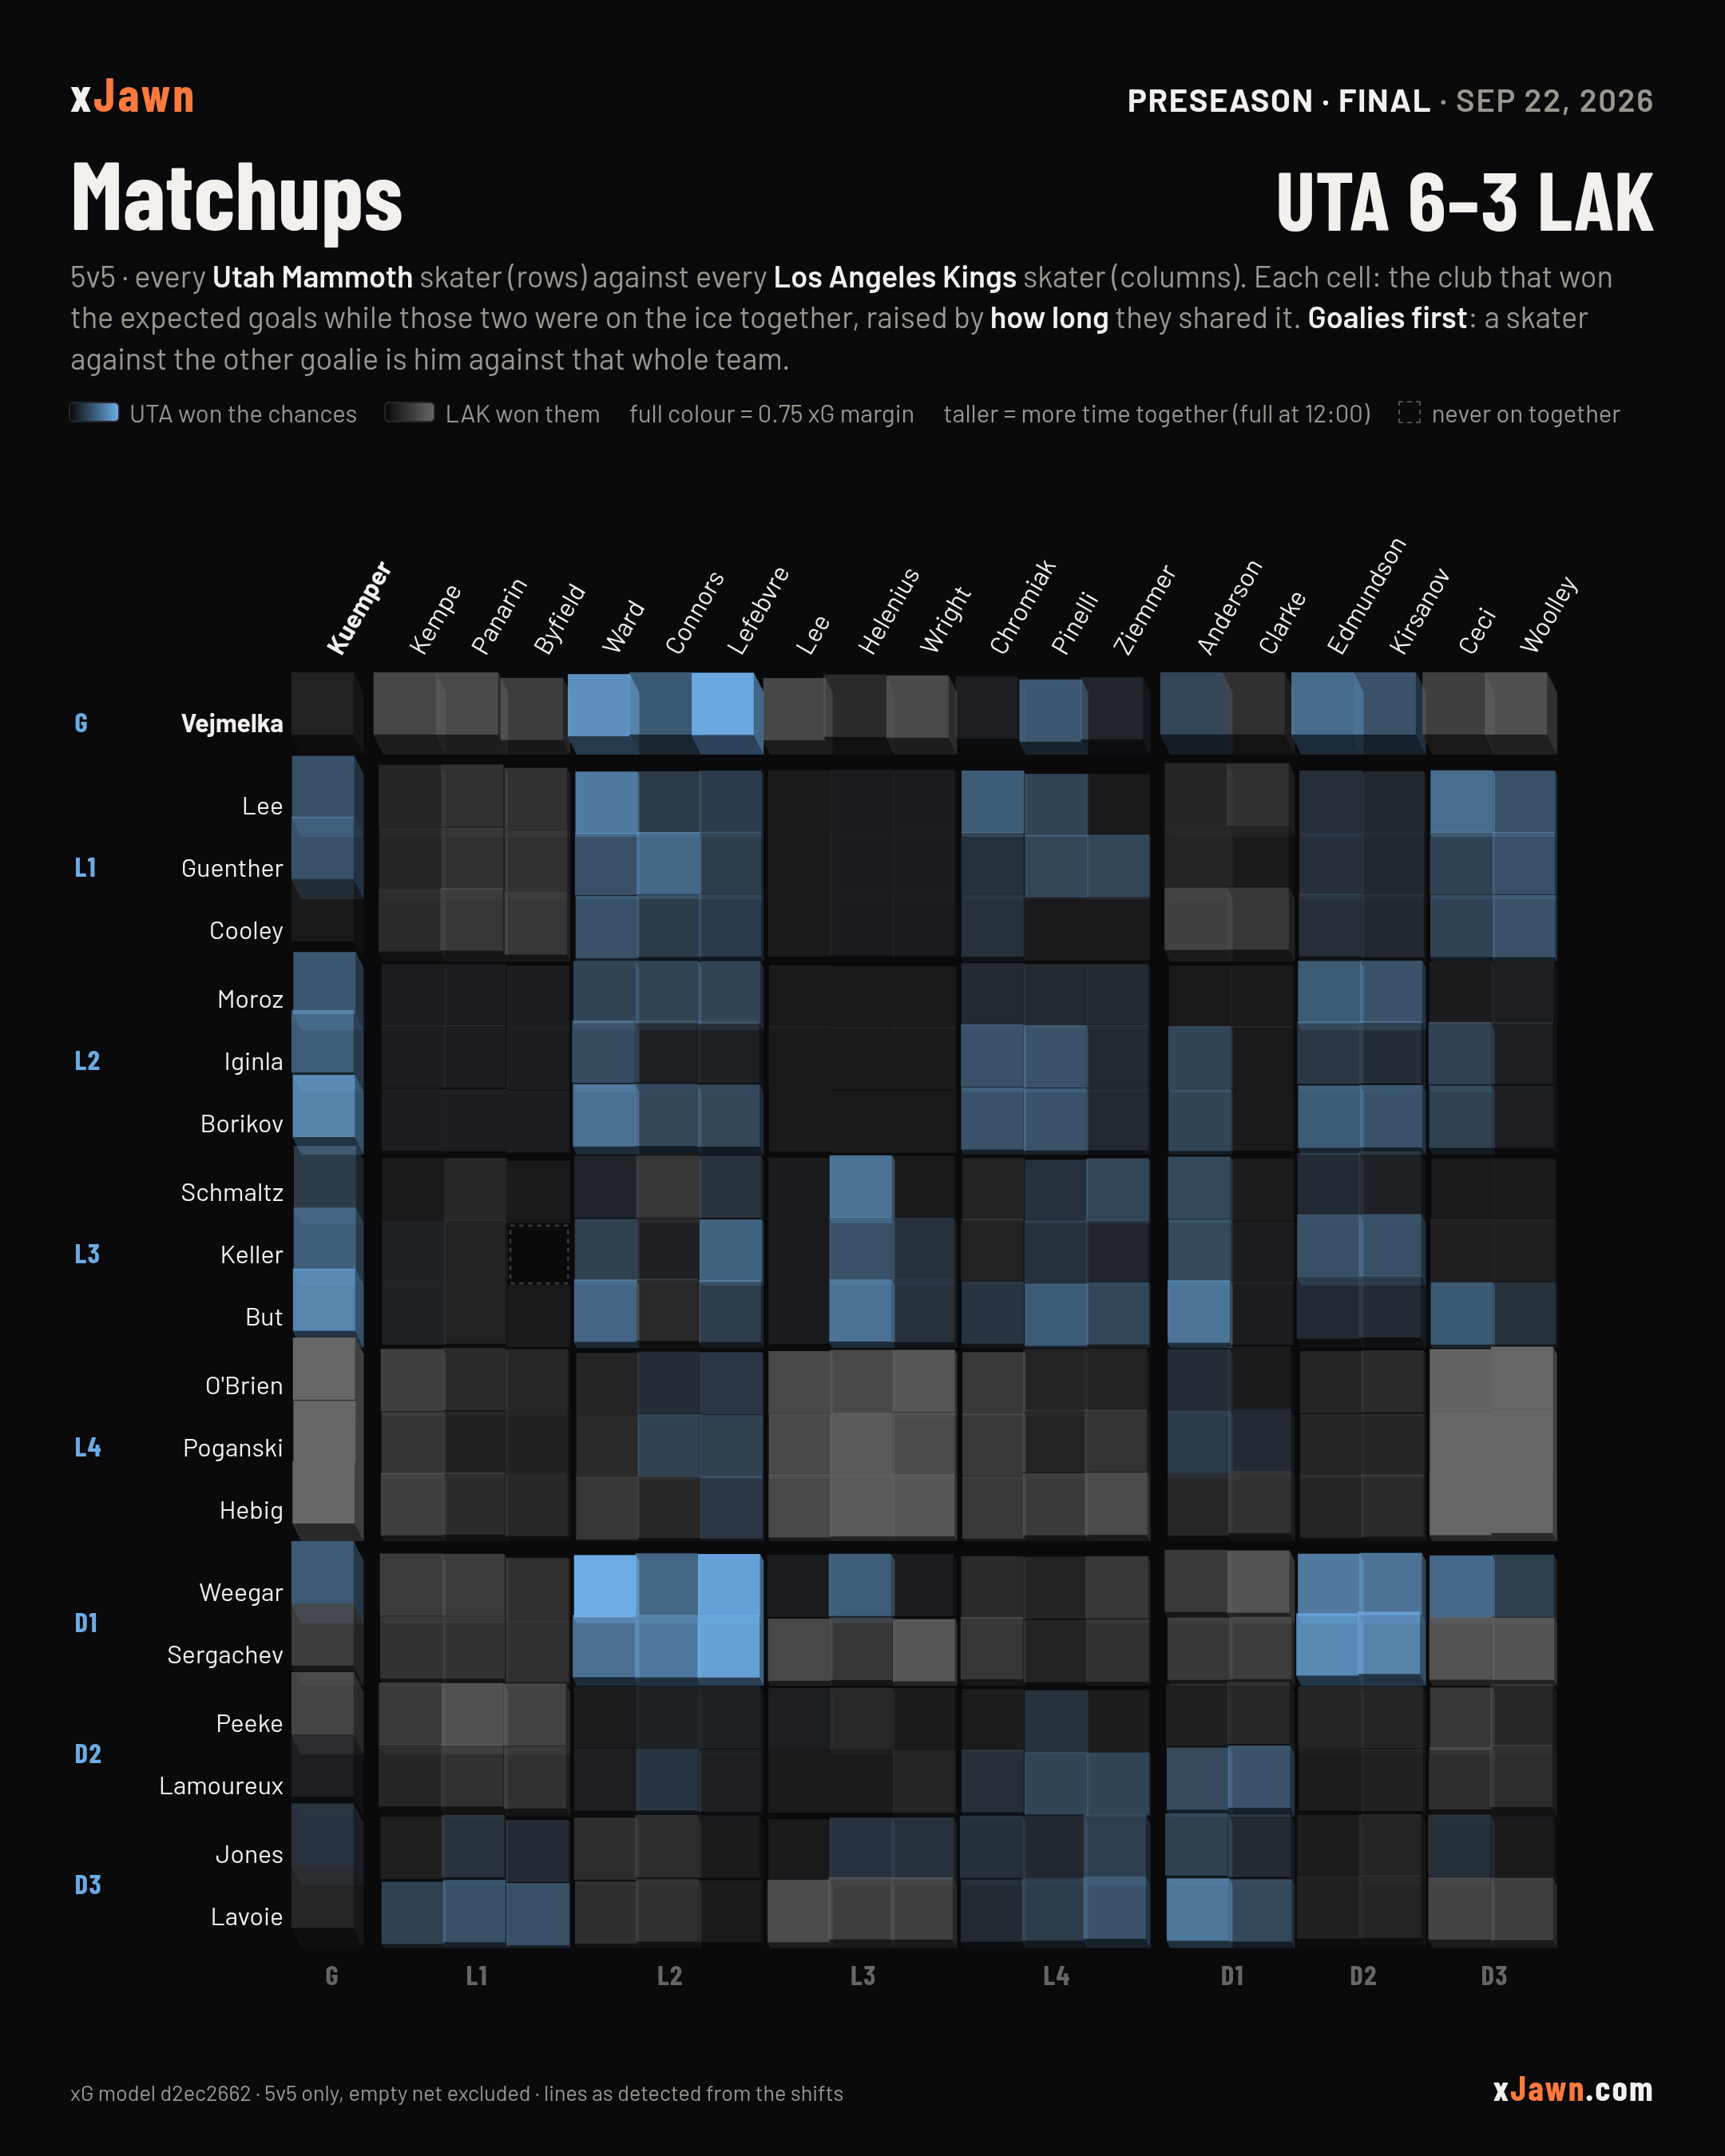
Rows are UTA's skaters, columns LAK's, grouped the way they played: forward lines (L1 = the line that played together most), then defence pairs. Each cell covers the five-on-five time those two players shared the ice. Its colour is the club that out-chanced the other in that time — expected goals for minus against — and the stronger the colour, the bigger the margin. Each cell is also raised: the taller the block, the longer the two shared the ice, up to full height at 12:00 of five-on-five time. A grey cell means they met and it came out even; an open, flat one means they never met at five-on-five.
The first row and column are the goalies. A goalie is in net for every five-on-five second, so a skater's cell against the other side's goalie is all of that skater's five-on-five time against that team — the rest of his row or column added up — and the corner where the two goalies meet is the game's five-on-five. Those cells cover far more time than any pair, so they reach full colour sooner and stand at full height, a wall along each edge of the grid. A goalie change adds a second goalie row or column, each covering his own time.
Linemates share the ice, so a line against a line reads as a block. The margin is a total, not a rate: a long matchup has room to build a big gap and a thirty-second one does not — which is what the height is there to show: a tall, strong cell is the game's story; a short, strong one is a moment. Hover (or tap) any cell for the exact time together, the xG each way, attempts and goals. One game — a strong cell is what happened, not what would happen again.